Ceiling Leak Water Damage in Lakeville, MN
A stained or sagging ceiling means water is sitting above it. The drying team finds where it started, opens the drywall in a controlled way and dries the insulation and joists that took the water.
(888) 432-4933Ceiling dripping? Call now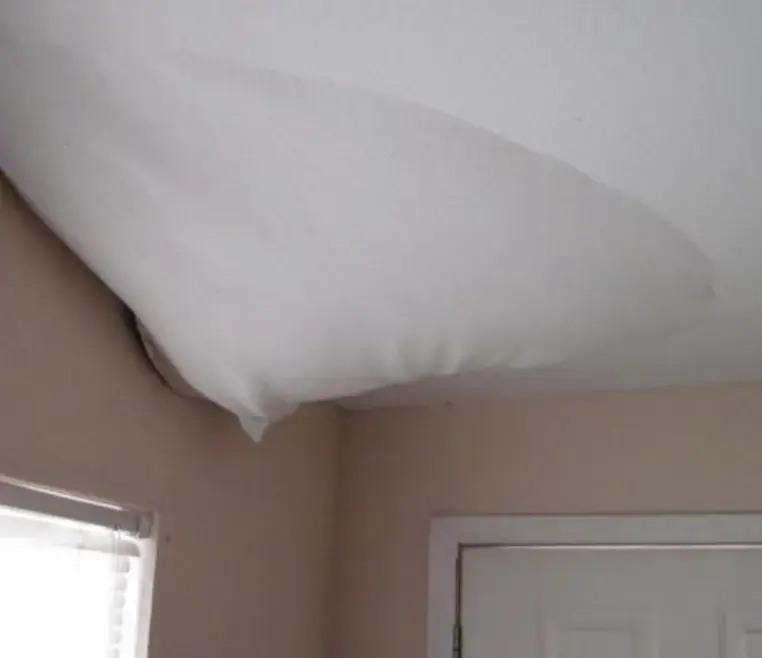
A brown ring on the ceiling tells you where water arrived, not where it began. Gravity and the framing carry it sideways before it drips, so the stain is often a long way from the leak.
First steps for ceiling leak water damage in Lakeville
Stop the water above
Shut off the fixture or supply upstairs if the leak comes from plumbing.
Stay clear of the sag
A drooping section can hold gallons and fall without warning.
Switch off ceiling lights
Water in a fixture is a shock risk, so use the breaker.
Photograph the stain
Capture its size, the drip and the room before any cleanup.
How ceiling leak water damage is handled in Lakeville
The tech who does the walkthrough maps moisture before any equipment goes down, so the drying plan matches what is actually wet. Equipment stays until the readings say dry, not until it looks dry.
- 1
Find the source
Meters and infrared follow the water back along the joists.
- 2
Release the water
A sagging section is opened carefully so trapped water drains out.
- 3
Remove wet material
Soaked drywall and insulation are cut out and bagged.
- 4
Dry the bays
Air is pushed through the joist cavities until readings reach the dry goal.
What sends water through a Lakeville ceiling
Lakeville has about 26,315 housing units, and a typical house here dates from around 1999, so two-story layouts with bathrooms over living space are common. The causes below are the common ones, and the first job is always to find which applies.
- Shingle or flashing damage after a storm or a thaw.
- A tub, shower or toilet supply on the floor above, where a small drip can run for weeks.
- A pipe running through the joists that begins to weep.
- Condensation from a poorly vented bath fan.
How the wet ceiling is handled
Before anyone stands underneath, the technician checks for a bulge. A bulging section is pierced so the water runs into a bucket instead of the room. Infrared imaging then maps the damp area, and wet drywall and insulation are cut out. Dry air is directed into the joist bays until they test normal. When the source is a burst pipe, that repair comes first.
- Light fixtures in a wet ceiling are switched off at the breaker before work starts.
- Insulation that has soaked is replaced after drying.
- Readings are taken each day until the framing is dry.
Ceiling leaks and the claim
Sudden leaks tend to be covered, while slow seeps that went on for months often are not. Coverage depends on the policy, so check with your own insurer. Photographs of the stain, the source and the daily logs help. For a leak from the roof, see roof leak water damage.
Ceiling leak water damage across Lakeville and nearby towns
The Lakeville restoration crew covers ZIP 55044, including Downtown Lakeville, Orchard Meadows of Lakeville, Fox Meadows, Great Oak and Ritter Meadows, for ceiling leaks in single-family houses and townhomes.
The same service nearby: ceiling leak water damage in Burnsville, Apple Valley, Savage.
Related water damage services in Lakeville
Ceiling Leak Water Damage questions in Lakeville, MN
01Why is the stain not under the leak?
Water follows joists and pipes before it drips, so the mark often shows up some distance from the source.
02Should I poke the bulge myself?
It is risky. A bulge holds a lot of water, and a trained crew drains it in a controlled way so the ceiling does not collapse on whoever is below.
03Can a stained ceiling be painted over?
Not until the framing above is dry. Paint hides the stain but traps moisture and invites mildew.
04Does the insulation need replacing?
Most of the time, when it was soaked. Wet insulation stays damp for weeks and presses against the drywall, so replacing it after drying is the usual call.
05How long does drying take?
Three to five days is typical for a single area, and more for several bays or a second floor.
06Will insurance help?
Sudden leaks are often covered. Slow, long-running ones may not be, so confirm with your own insurer.
Wet ceiling in your Lakeville home? Get it dried.
Drywall and insulation hold water long after the drip stops. Early opening saves more of the ceiling.
Burnsville Water Damage Restoration · Burnsville, MN